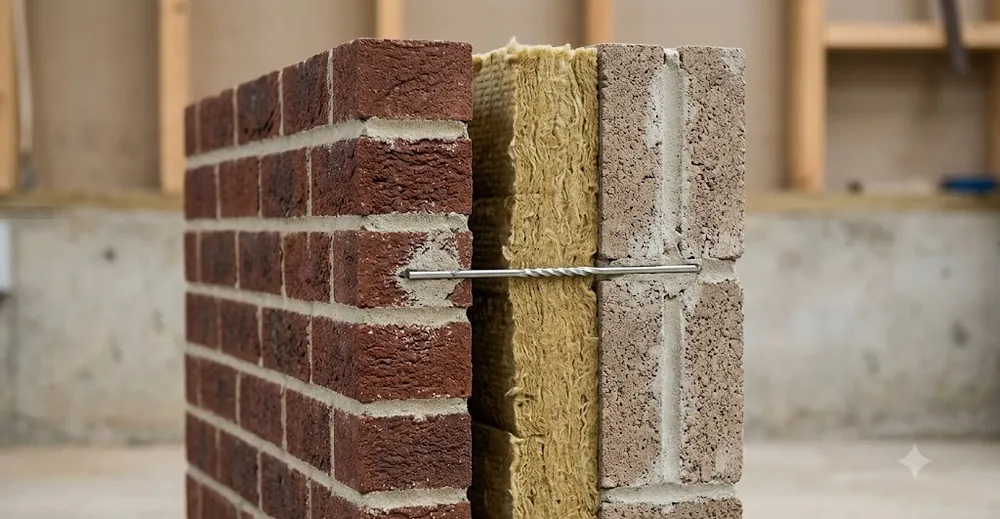
What cavity wall ties actually do
A cavity wall is two separate leaves: an inner structural leaf and an outer veneer, usually brick. The ties are the only thing connecting them. They transfer lateral wind load from the veneer back to the structure, resist suction, and let both leaves act together against buckling. Without ties, the outer brick skin is a tall, thin panel with almost no resistance to wind.
But a tie is also a bridge, and water loves a bridge. Rain that soaks the outer brick runs down the inner face of the veneer and collects in the cavity. If the tie slopes the wrong way or lacks a drip, that water tracks straight across to the inner leaf and shows up as a damp patch inside. So every good cavity tie balances two demands: stiff enough to move load, shaped so water falls off before it reaches the inside.
How do you select cavity wall ties by cavity width?
The cavity width sets almost everything else. Tie length has to give proper embedment in both leaves plus span the gap, and both stiffness and corrosion class rise as the cavity gets wider. A common rule across codes is a minimum embedment of roughly 50 mm (2 inches) into each leaf, so total tie length is cavity width plus both embedments plus a small tolerance.
Here is a practical starting table. Treat it as guidance and always defer to your local code and the structural drawings.
| Cavity width | Typical tie length | Common material / class | Notes |
|---|---|---|---|
| 50-75 mm | 200-225 mm | Hot-dip galvanized or stainless 304 | Light residential veneer |
| 76-100 mm | 225-250 mm | Stainless 304, heavier gauge | Standard modern cavity |
| 101-150 mm | 250-300 mm | Stainless 304/316, stiffer profile | Insulated cavity, exposure matters |
| 151-300 mm | 300-450 mm | Stainless 316, engineered tie systems | Wide insulated cavity, check deflection |
Two points sit behind that table. First, as the span grows the tie can flex under load, so a wider cavity often needs a thicker wire or a barbed, stiffer profile rather than just a longer version of the same tie. Second, corrosion resistance should scale with exposure and expected building life. For coastal, wind-driven-rain sites, or anything you expect to stand 60 years or more, stainless steel is the safer default. Galvanized ties are still specified on sheltered, shorter-life projects, but once moisture and chlorides are in play, stainless earns its cost.
For the connection back into brickwork specifically, our brick wall ties range covers the common lengths and classes above, and we can cut to project length when a wide cavity needs a non-standard size.
Why does the drip matter, and where does it go?
The drip is the small downward kink or twist formed into the middle of the tie. Its whole purpose is to force water to gather at the lowest point of the tie and fall off into the cavity, rather than creeping along the wire to the inner leaf. A tie without a drip, or with the drip pointing the wrong way, becomes a wick.
Three rules keep a drip working. The drip must sit in the open cavity, not buried in mortar or pressed against insulation. It must point down, so the low point of the tie is somewhere near the middle of the air gap. And the tie should slope slightly down toward the outer veneer, never back toward the inner leaf. We have seen more damp complaints from ties bedded with a backward slope than from any material fault. When the outer end sits higher than the inner end, gravity does exactly the wrong thing.
If your ties are the wire "butterfly" or double-triangle type, the twist at the centre is the drip, and orientation still matters. Flat or plate ties usually carry a stamped or bent drip feature. Whatever the form, check on site that the low point falls clear in the cavity.
What embedment and mortar cover do cavity wall ties need?
Embedment is how far the tie sits into each leaf, and cover is the mortar that surrounds it. Both protect the tie and let it grip. Most codes ask for around 50 mm of embedment into each leaf, with the tie fully bedded in fresh mortar so no part of the embedded end is exposed in the cavity. A tie resting on the brick with mortar dabbed on top is not embedded; it will pull out under load and corrode at the gap.
Level the bed course so the tie sits flat in the joint, then lay mortar over it as the next course goes down. The embedded portion should be continuous inside solid mortar, with the outer leaf mortar not so full that it blocks the cavity or bridges to the inner leaf. Keeping the cavity clean is part of this: mortar droppings that pile on a tie form a shelf that carries water across the gap, undoing the drip entirely. A cavity batten laid on the ties and lifted between courses is a cheap way to catch droppings.
Placement geometry also drives performance. Ties are set to a grid, typically denser near openings and at the top of the wall where wind suction peaks. Spacing sits outside this article's scope, but it is not optional; under-spaced ties are a common cause of veneer movement. For the numbers, see our companion guidance on wall tie spacing.
How does cavity insulation change tie selection?
Insulation changes three things: the cavity gets wider, the tie must hold the insulation, and the drip has less open space to work in. Partial-fill insulation leaves a clear residual cavity between the board and the outer veneer, and the tie usually carries a retaining clip or disc that pinches the board against the inner leaf. Full-fill insulation packs the whole cavity, so the tie passes straight through the material.
Each approach has a catch. With partial fill, the residual cavity must stay clear and the drip must sit in that clear zone, not against the board face, or water tracks down the insulation and across the tie. With full fill, there is no open air space, so the specification leans even harder on a well-formed drip and on insulation that will not wick moisture across itself. In our experience supplying insulated-cavity projects, the two failures we hear about most are retaining clips fitted on the wrong side of the board, and ties bent to clear an over-thick board so the drip ends up buried. Both are avoidable at first-fix if the crew checks one tie before running a whole lift.
Because insulated cavities are wider, revisit the selection table above. A 150 mm cavity with full-fill insulation is a different structural animal than an empty 75 mm cavity, and the longer span usually justifies a stiffer, higher-class stainless tie.
What are the most common installation mistakes?
The failures are boringly consistent, which is good news, because they are all preventable. The big five are: ties sloping toward the inner leaf, drips buried in mortar or insulation, mortar droppings bridging the cavity, embedment shorter than the code minimum, and the wrong corrosion class for the exposure. None of these show up on completion. They show up two winters later as a damp stain or, worse, as movement in the veneer.
A short site routine catches most of them. Check the slope by eye on the first course of each lift; the outer end should sit level or a touch lower. Confirm the drip hangs clear in the cavity. Keep a cavity batten in place and clean it between courses. Measure embedment on a sample tie against the drawing. And confirm the delivered ties match the specified material class before the first one goes in, not after the wall is up. We include material and class markings on our packaging precisely so this last check takes seconds.
One more habit pays off: photograph a representative tie in place at each floor level. When a designer or building inspector asks how the cavity was detailed, a dated photo of a correctly sloped, drip-clear tie settles the question faster than any certificate.
Frequently asked questions
Should a cavity wall tie slope toward the inside or the outside?
Always toward the outer veneer, never toward the inner leaf. The tie should sit level or drop slightly on its outer end so any water that lands on it runs away from the inside of the building. A backward slope turns the tie into a channel that carries water straight to the inner leaf, which is one of the most common causes of unexplained cavity damp.
How deep should cavity wall ties be embedded in the mortar?
Most codes call for a minimum embedment of about 50 mm (2 inches) into each leaf, fully surrounded by fresh mortar. The embedded end must be bedded, not just topped with mortar, so it grips under load and stays protected from corrosion. Always confirm the exact figure against your local code and the structural drawings, since exposure and cavity width can push the requirement higher.
Do wider insulated cavities need different ties?
Yes. A wider cavity increases the unsupported span, so the tie must be longer and usually stiffer, often a thicker gauge or a barbed profile, to move load without flexing. Insulated cavities also demand careful drip placement in the residual air space and, for exposed sites, a higher stainless class. Reselect from a cavity-width table rather than simply lengthening the tie you used on a narrow wall.
What is the drip on a cavity wall tie for?
The drip is the low point formed into the middle of the tie that makes water collect and fall off into the open cavity instead of tracking to the inner leaf. It only works when it sits clear in the air space and points down. If the drip is buried in mortar, pressed against insulation, or facing the wrong way, the tie stops shedding water and can wick moisture across the gap.
Are stainless steel cavity wall ties always necessary?
Not always, but they are the safer default for long-life buildings and exposed or coastal sites where wind-driven rain and chlorides attack the steel. Hot-dip galvanized ties are still specified on sheltered, shorter-life projects at lower cost. Match the corrosion class to the expected building life and exposure rather than to price alone, because a failed tie is far more expensive to replace than to specify correctly.
Talk to us about your project
Getting cavity wall ties right is mostly disciplined detailing: correct length for the cavity, the right corrosion class for the site, a drip that hangs clear, and honest embedment. If you tell us your cavity width, insulation type and exposure, we will help you match a tie and cut to length where needed. Request a quote and we will get you specifications and pricing.
