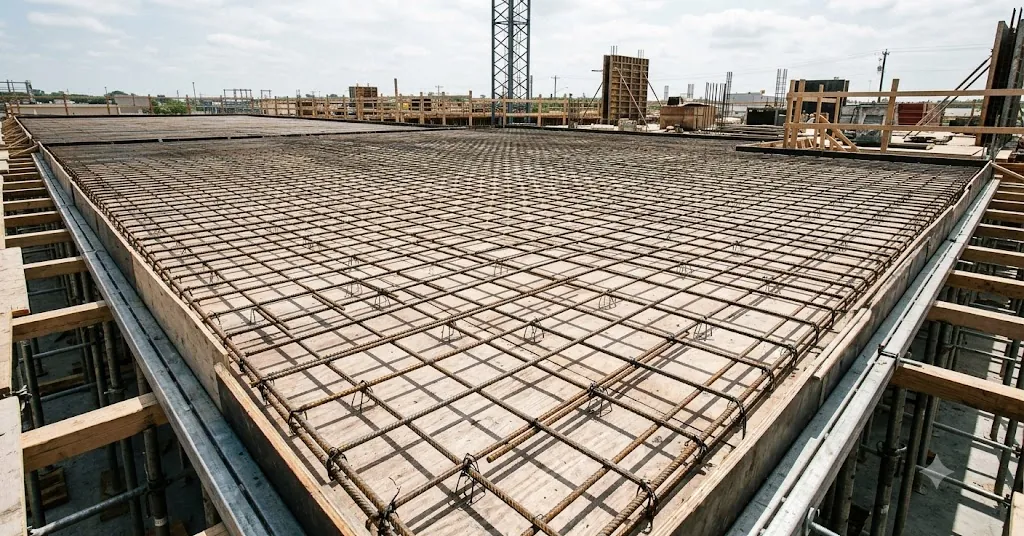
At Hebei Leeter Import and Export Co., Ltd ("Leeter"), we have shipped wire, mesh, and bar supports out of Dingzhou, Hebei since 2006, mostly to contractors and fabricators across North America and Europe. This guide explains how the common tolerance concepts work, why consistency matters more than any single measurement, and which accessories actually control the outcome on a pour day.
What rebar placement tolerances actually mean
A tolerance is a permitted deviation, not a target. When a drawing calls for 50 mm of cover, the design assumes the finished cover will sit within a stated band above and below that number. The same idea applies to bar spacing, to the position of the top mat in a slab, and to the effective depth of a member. Codes and placement standards publish these bands so that inspectors, detailers, and crews all measure against the same rules.
Different reference documents express tolerances in different ways, and the exact figures depend on the standard your project follows. Rather than quote numbers that may not match your jurisdiction, it helps to understand the categories that get toleranced and how they interact. The three that matter most on almost every job are cover, spacing, and effective depth.
Cover tolerance
Cover is the distance from the outside face of the concrete to the nearest surface of the reinforcement. It protects steel from corrosion and gives the structure its fire resistance, so cover tolerance tends to be the tightest and most closely inspected dimension on the mat. The permitted deviation is usually smaller than for spacing, because too little cover exposes bars to moisture and chlorides, while too much cover reduces the effective depth and quietly weakens the section.
Cover is controlled from below by supports that sit on the form or subgrade, and from the sides by spacers against the formwork. If those supports are the wrong height, or if they sink into soft ground, every bar above them inherits the error.
Spacing tolerance
Spacing is the center-to-center distance between parallel bars. The tolerance here is generally more forgiving than cover, since a bar that sits a little off its line still contributes almost the same capacity. What matters is that the total number of bars is correct and that no gap grows large enough to leave concrete unreinforced or too small for aggregate to pass through. Uniform spacing also keeps crack widths predictable across the member.
Effective depth tolerance
Effective depth is the distance from the compression face of the concrete to the centroid of the tension steel. It drives the bending capacity of the member, so a small change in depth has a larger effect than a small change in spacing. Because effective depth depends directly on cover and on the height of the supports holding the top mat, it is really a downstream result of the other two. Control the supports and the ties, and effective depth follows.
Why consistency matters more than any single reading
A tape measure at one corner of a slab tells you almost nothing about the reinforcement as a whole. Placement quality lives in the variation across the entire mat, not in a single lucky reading. If half the chairs are the correct height and half have been crushed or substituted, the top steel will wander in and out of tolerance across the pour, and an inspector only has to find one bad spot.
Consistency is what turns a design assumption into a built reality. When every support is the same height and every intersection is tied firmly, the mat behaves as one plane. Concrete placement then becomes the real test, because workers drag hoses, walk on the steel, and vibrate the mix, all of which push bars around. Reinforcement that was uniform before the pour tends to stay inside tolerance during it. Reinforcement that was already uneven rarely survives.
There is a second, quieter reason consistency pays off. Rework on placed steel is expensive and slow. Moving a top mat after inspection means untying intersections, resetting supports, and re-inspecting, often with the ready-mix truck already scheduled. Getting the height and ties right the first time is far cheaper than fixing them under pressure.
Which accessories control placement tolerances
Three accessory families do almost all of the work of keeping reinforcement in tolerance: supports that set height, spacers that set side cover, and ties that lock everything in position. Each one addresses a specific tolerance, and skipping any of them shifts the risk onto the other two.
| Accessory | Tolerance it controls | Failure mode if wrong |
|---|---|---|
| Bar chairs and bolsters | Bottom cover, effective depth | Bars sag or sit too high, cover drifts |
| Side spacers and wheels | Side cover against formwork | Bars touch the form, cover lost, rust staining |
| Continuous high chairs | Top mat height in slabs | Top steel drops, effective depth falls |
| Tie wire and clips | Spacing, position, stability | Intersections slip during the pour |
| Precast concrete blocks | Bottom cover on grade | Blocks tip or sink in soft subgrade |
Chairs and bolsters set the height
Bar supports carry the reinforcement at a fixed height above the form or ground, which is what fixes bottom cover and, for the top mat, effective depth. The important properties are the correct height for the specified cover, enough bearing area so the support does not punch into soft subgrade, and enough strength to hold a worker's weight without collapsing. Our rebar chairs come in graded heights so a crew can match the exact cover a drawing calls for rather than rounding to whatever happens to be on the truck.
Spacing of the supports themselves matters too. Set them too far apart and the bars sag between them, so the cover measured at midspan differs from the cover measured over a chair. Follow the support spacing on the placement drawings, and reduce it for heavier bars or for mesh that flexes.
Spacers protect the side cover
Vertical faces need cover too, and gravity does not help there. Side spacers, wheels, and clip-on spacers hold the cage off the formwork so concrete can flow around every bar. Without them, a column or wall cage tends to lean against one face, producing zero cover on that side and rust bleeding through the finished surface within a season.
Ties lock the geometry in place
Supports set height and spacers set side cover, but ties are what keep the whole assembly from moving while concrete is placed and vibrated. A firmly tied intersection resists the drag of a hose and the push of an immersion vibrator. A loose or missing tie lets bars slide, which opens or closes spacing and can drop a bar out of its supports entirely. Good rebar tie wire, snugged with a consistent twist, turns a loose stack of bars into a rigid mat that holds its shape from inspection through finishing.
Not every intersection needs a tie, and over-tying wastes labor without adding capacity. The placement drawings or the governing standard will state a tying pattern, commonly a portion of intersections on the interior and a higher rate around the perimeter and at corners where movement concentrates.
A simple field routine for staying in tolerance
Crews that consistently pass inspection tend to follow the same short sequence, and it does not require special equipment. The goal is to catch a height or spacing error while it is still cheap to fix, meaning before the mat is fully tied and long before the truck arrives.
- Confirm the specified cover, then select supports whose height produces that cover, allowing for bar diameter.
- Set supports at the spacing shown on the drawings, tightening it for heavier or more flexible bars.
- Place bars, check spacing against a marked template or the mesh layout, and adjust before tying.
- Tie the pattern the drawings require, snug enough that intersections do not shift by hand.
- Add side spacers on every vertical face and confirm the cage cannot lean against the form.
- Walk the mat once for missing supports, crushed chairs, and loose ties before calling for inspection.
This routine works because it treats tolerance as something you build in, not something you measure at the end. Every step targets one of the three toleranced dimensions, and each check happens while the fix is still a matter of nudging a bar rather than untying a slab.
How material choices affect the outcome
The reinforcement itself influences how easily a crew holds tolerance. Straighter bars and flatter mesh sit more predictably on supports, so cover stays uniform without constant correction. Mesh that arrives with a consistent, flat profile lets a crew rely on the sheet geometry for spacing instead of measuring every wire. Tie wire of the right temper twists tight without snapping, which speeds tying and produces joints that actually hold.
None of this replaces good workmanship, but it removes friction from it. When the material behaves, the crew spends its time placing steel accurately rather than fighting kinks, springback, and broken ties. That is where consistent supply quietly pays back on labor.
Frequently asked questions
What is the difference between cover tolerance and spacing tolerance?
Cover tolerance limits how far the distance from the concrete face to the steel can deviate, and it is usually tight because cover protects against corrosion and fire. Spacing tolerance limits how far center-to-center bar distances can vary, and it is generally more forgiving because a slightly misplaced bar still carries nearly its full share of load.
Do exact tolerance numbers come from the code or the drawings?
Both. The governing building code or placement standard sets the baseline permitted deviations, while the project drawings and specifications can tighten them for specific members. Always confirm the figures for your jurisdiction and project rather than relying on remembered numbers, since standards differ and specifications override the default allowances.
How does chair height affect effective depth?
Effective depth is measured to the centroid of the tension steel, so the height at which chairs hold the bars sets it directly. If chairs are too short or sink into soft ground, the top mat drops, effective depth falls, and the member loses bending capacity. Correct, uniform chair height is the simplest way to protect effective depth.
Do I need to tie every bar intersection?
No. Tying every intersection wastes labor and rarely improves performance. Placement drawings or the governing standard specify a tying pattern, typically a fraction of interior intersections with more ties around the perimeter and at corners. The aim is a mat rigid enough to resist hose drag and vibration without shifting during the pour.
What causes reinforcement to fall out of tolerance during a pour?
Movement. Workers walking the mat, concrete hoses dragging across bars, and immersion vibrators all push steel around. Loose ties, missing supports, and crushed chairs let that movement translate into lost cover or shifted spacing. A mat that is uniformly supported and firmly tied before the pour resists these forces and stays inside its tolerance band.
Talk to Leeter about supports and tie wire
Holding rebar placement tolerances is mostly about consistent height and secure ties, and both start with the right accessories in the right sizes. If you are specifying chairs, spacers, mesh, or tie wire for a project in North America or Europe, request a quote and our team will help you match products to the cover and spacing your drawings call for. Reach out through our contact page to get started.
